PayEye
PayEye Tutorials
Instructions for Windows in English
Instructions for macOS in English
Installation video in other languages
Software Downloads
PayEye Troubleshooting
Installation Windows
Öffnen Sie die Datei (Installationsprogramm) mit einem Doppelklick
Wählen Sie die Sprache, in der die Installation ausgeführt werden soll

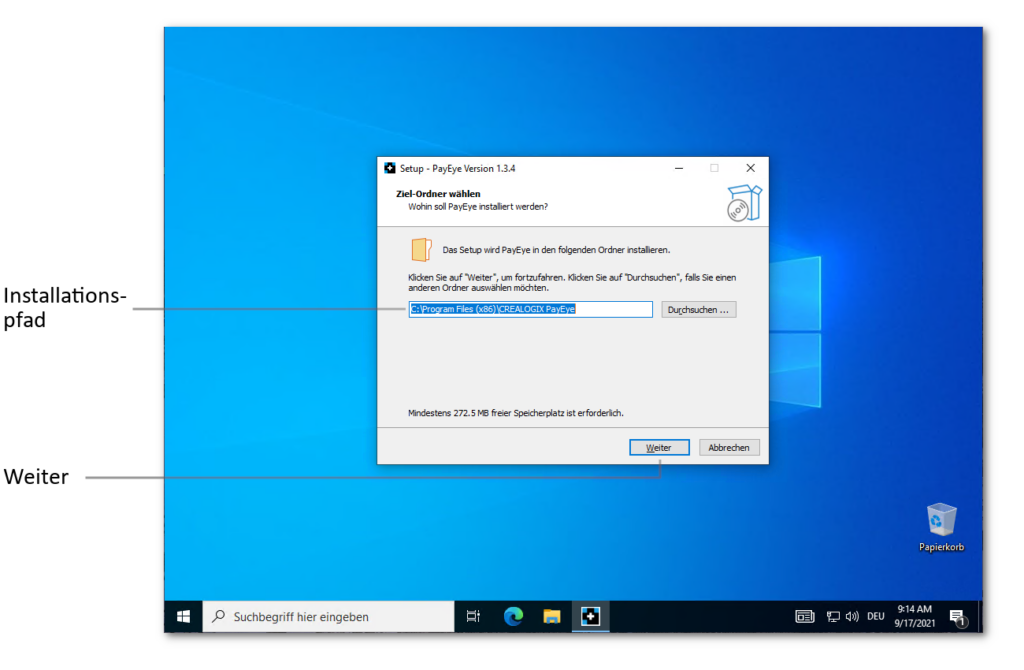
Wählen Sie nun den Installationspfad und klicken Sie anschliessend auf Weiter.
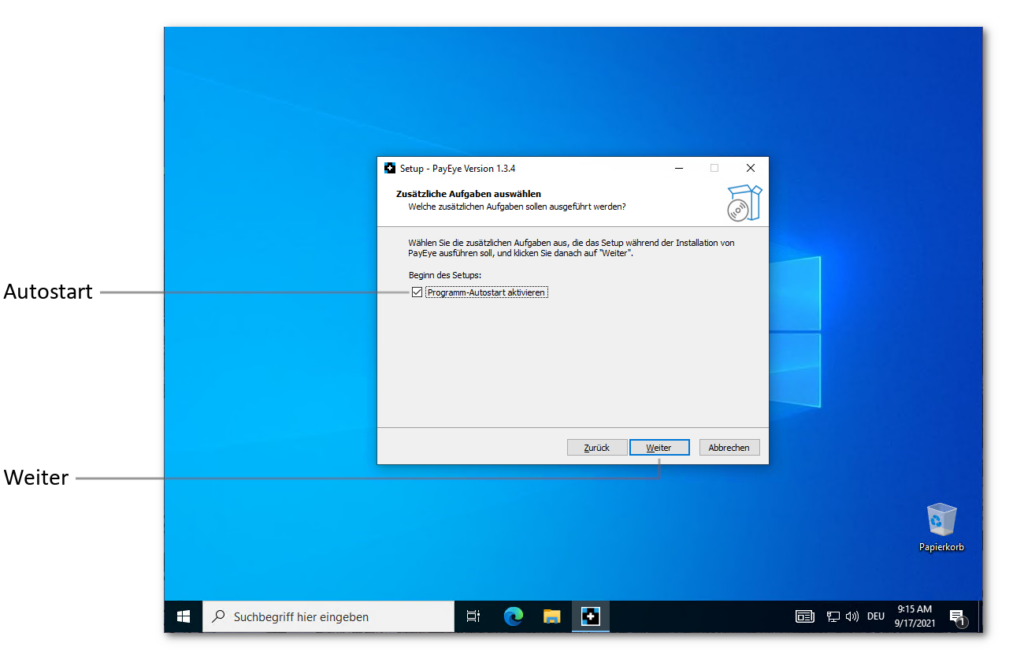
Im nächsten Schritt kann gewählt werden, ob die PayEye-Software jeweils beim Start des PCs mit gestartet werden soll (Autostart)
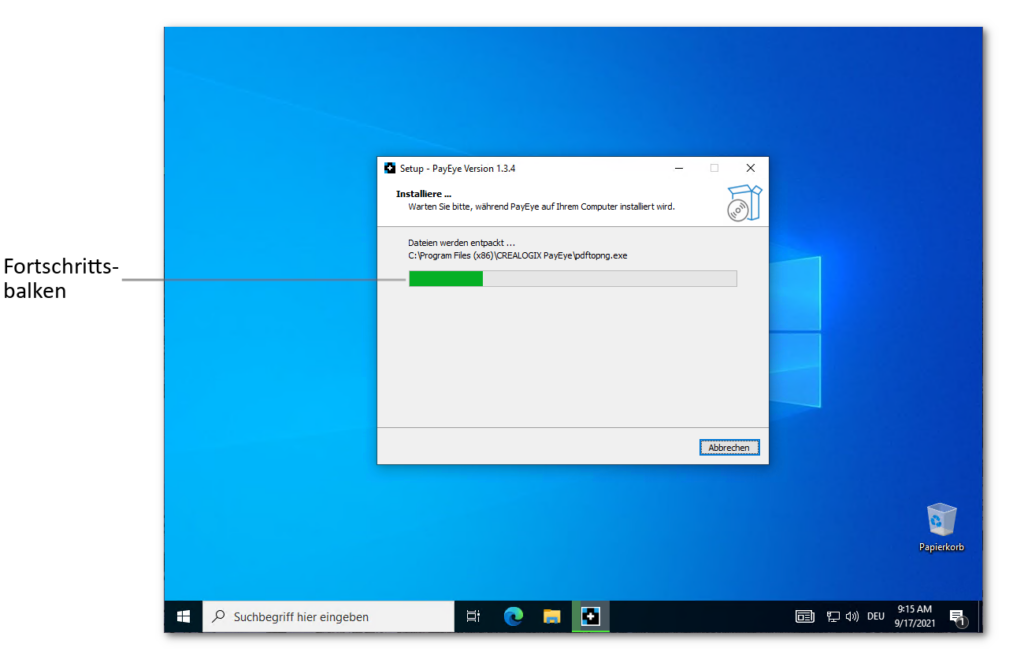
Wählen Sie danach «Installieren»
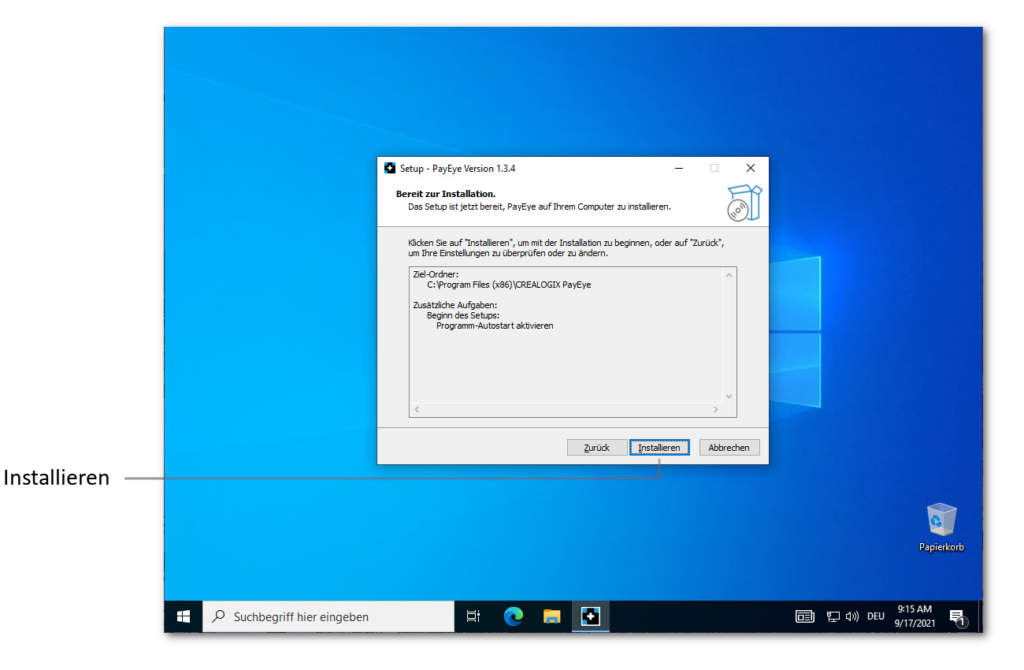
Warten Sie nun, bis die Installation abgeschlossen ist.
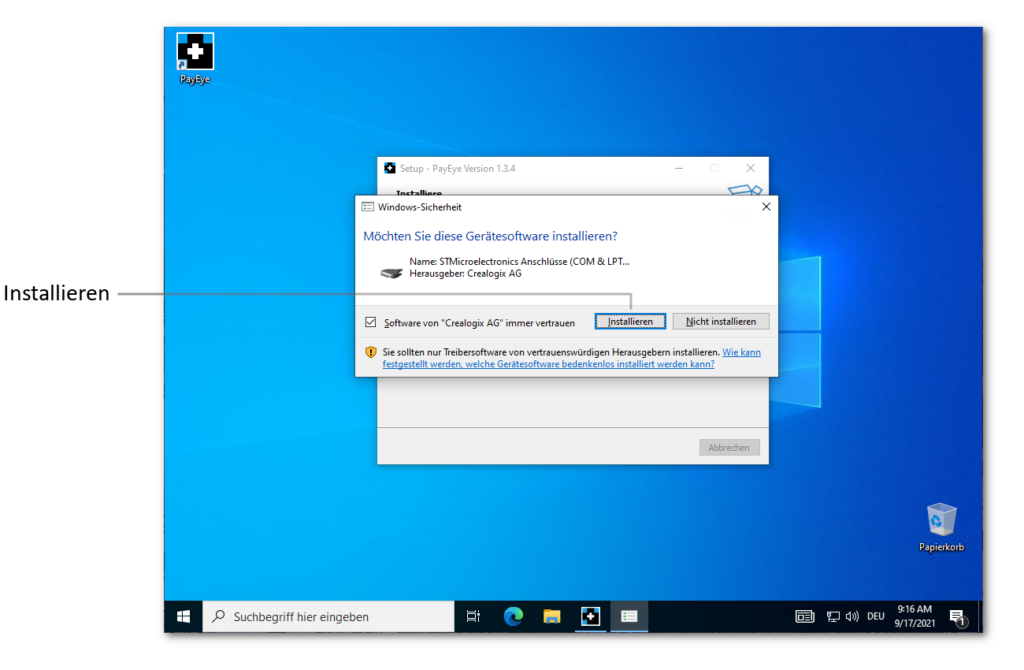
In einem weiteren Schritt werden im Hintergrund benötigte Geräte-Treiber installiert. Falls Sie diese Meldung erhalten sollten, bestätigen Sie diese mit «Installieren»
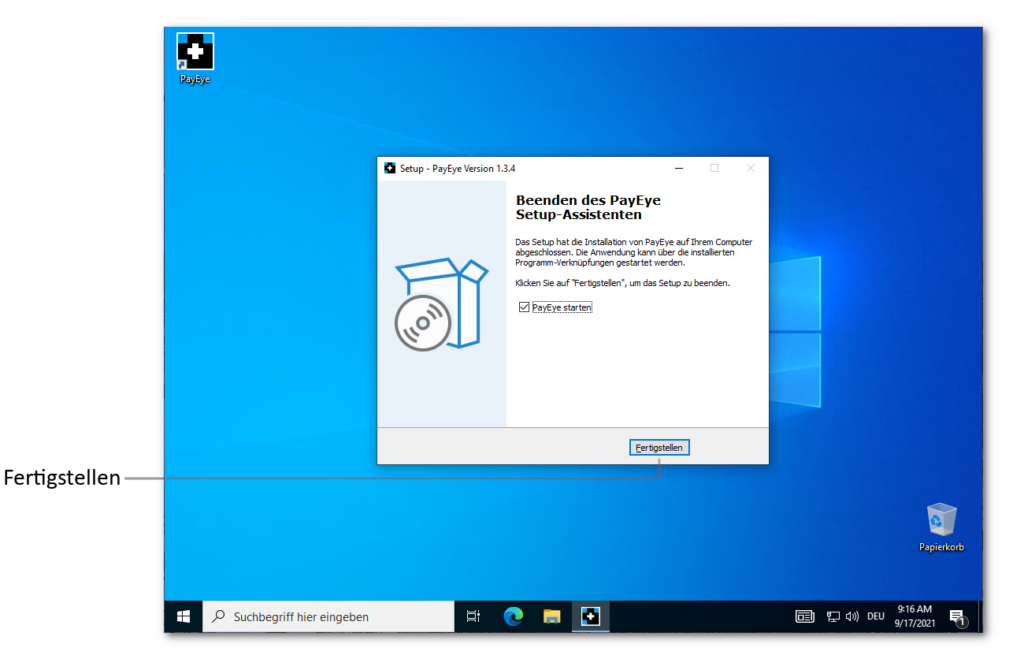
Nach der Installation, klicken Sie auf «Fertigstellen»
Die Software sollte nun gestartet werden mit dem «Installations-Assistenten»
Installation macOS
Je nach Finder-Einstellung sollte das geöffnete Disk-Image “PayEye_1.x.x.dmg” als «PayEye» in der Finder-Seitenleiste sowie auf dem Desktop angezeigt werden.
Ziehen Sie danach das PayEye- Programm-Symbol mit der Maus auf / in den «Programme»-Ordner.

Falls Sie macOS 10.14 “Mojave, 10.15 “Catalina”, 11.x «Big Sur», 12.x “Monterey” oder neuer verwenden
Wenn Sie eines der oben genannten macOS einsetzen, wird beim ersten Einlesen folgende Meldung erscheinen.
Klicken Sie nun auf “Systemeinstellungen öffnen”.

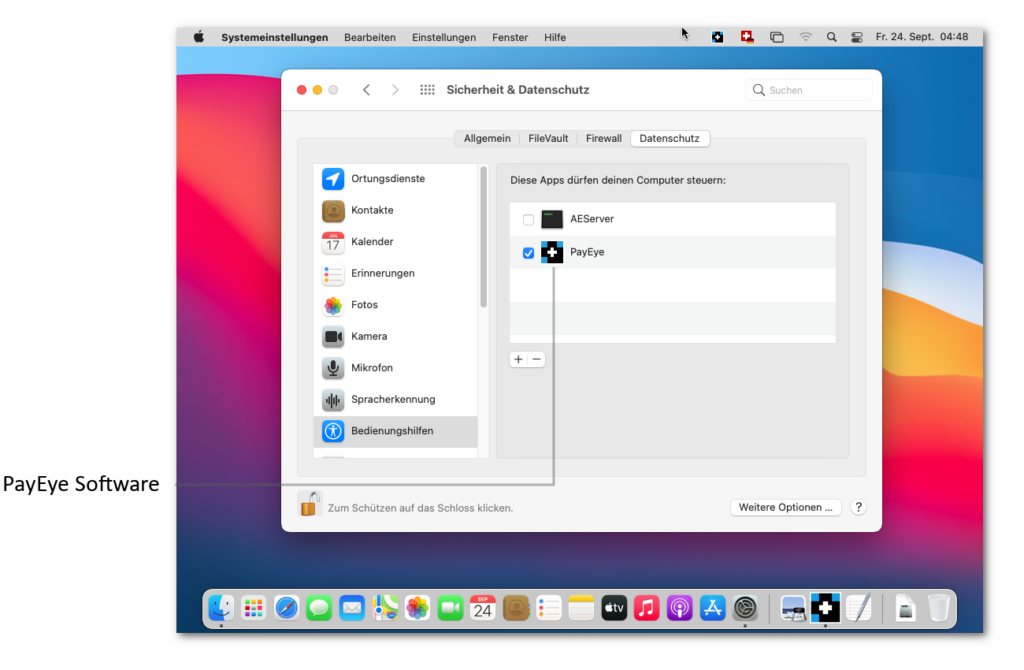
Es öffnet sich die Systemeinstellung im Bereich “Datenschutz” beim Punkt “Bedienungshilfen.
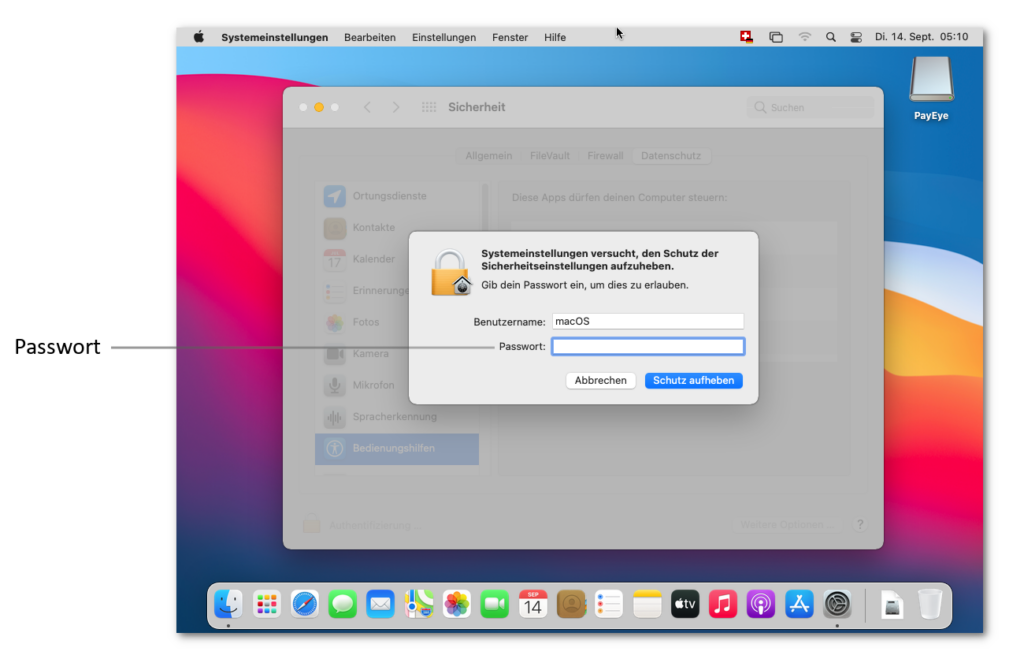
Öffnen Sie nun das Sicherheitsschloss.
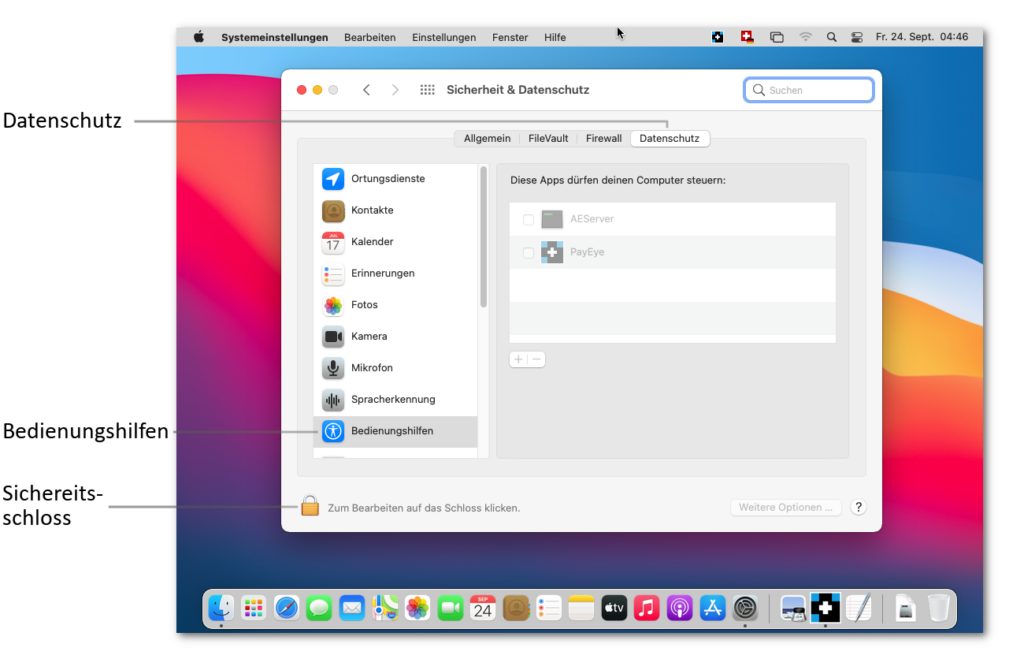
Falls Sie ein Kennwort eingeben müssen, handelt es sich hierbei um Ihr macOS Benutzer/Anmelde-Kennwort.
Aktivieren Sie nun die PayEye Software in der Liste. Danach können Sie das Fenster schliessen und Ihr PayEye ist einsatzbereit.
Ersteinrichtung mit Assistent
PayEye Applikation erscheint nun auf dem Monitor. Wichtig: dies ist nur bei der allerersten Installation der Fall. Sollte der Assistent nicht erscheinen, öffnen Sie die Software über die weiter unten beschriebenen Schritte.
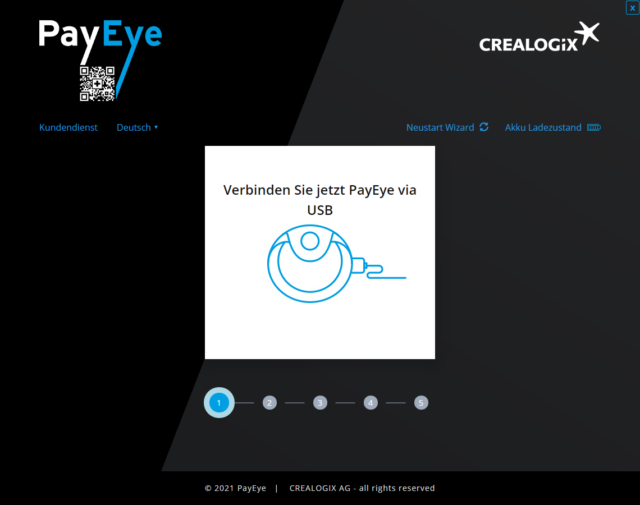
Verbinden Sie das PayEye per USB-Kabel direkt mit einem freien USB-Anschluss am PC/Mac
Sobald die Verbindung erfolgreich aufgebaut wurde, klicken Sie auf «Weiter»

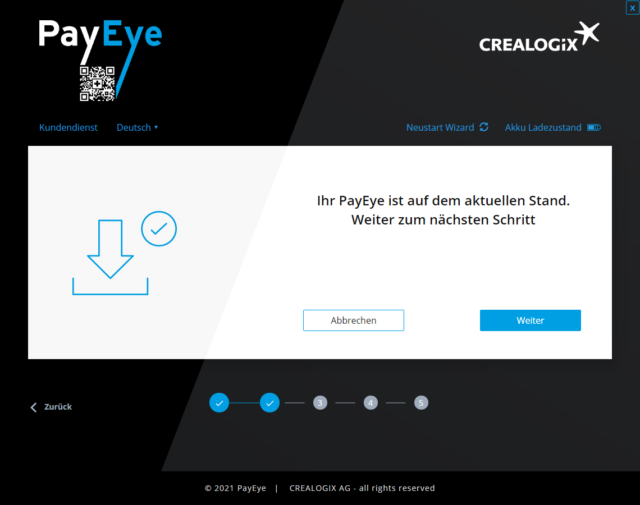
Im nächsten Schritt wird die Firmware (interne Geräte-Software) des PayEye überprüft und falls nötig aktualisiert
Wenn keine Aktualisierung bereitsteht, können Sie auf «Weiter» klicken
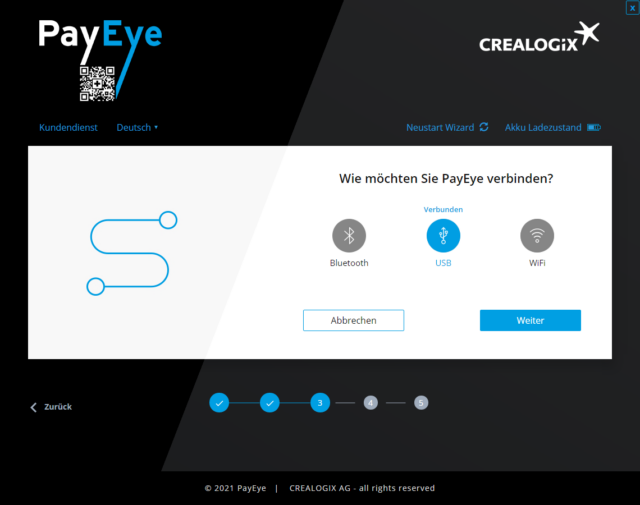
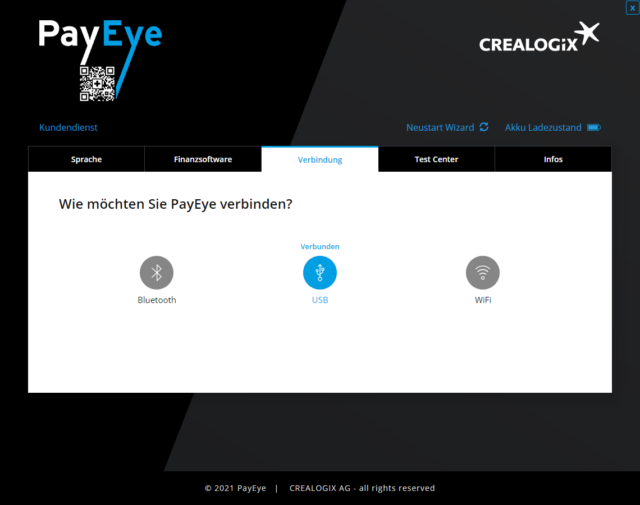
Nun wird die «Verbindung» definiert
Bleiben Sie für die Erstinstallation vorerst bei «USB» und klicken auf «Weiter»
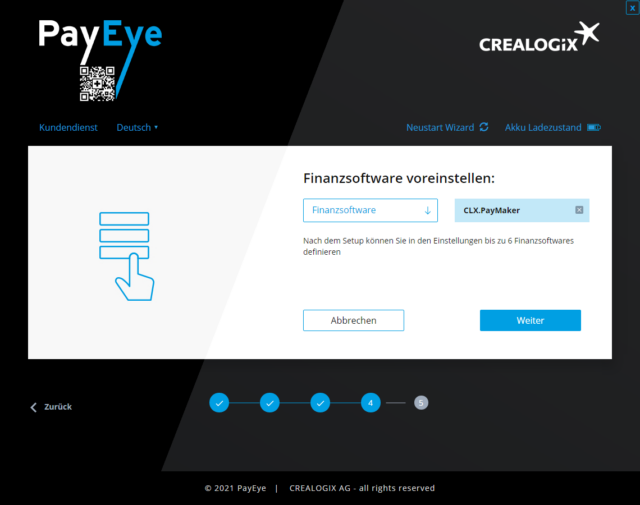
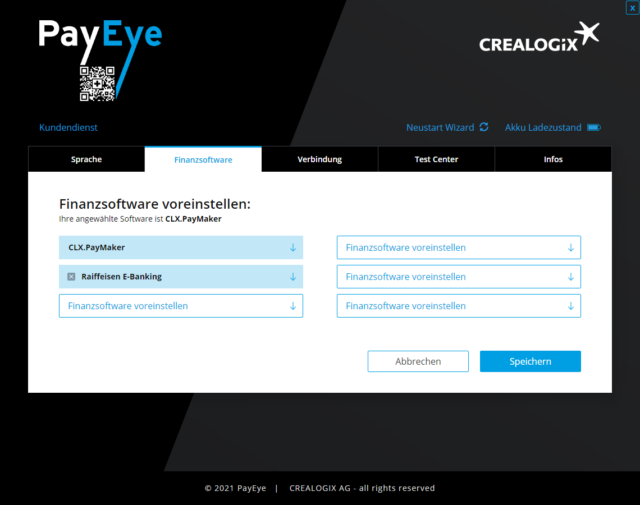
Wählen Sie nun Ihre bevorzugte Finanz-Software oder Ihr E-Banking in der Liste aus
In den «Einstellungen» (nach der Erst-Installation) können bis zu 6 verschiedene Einträge voreingestellt werden
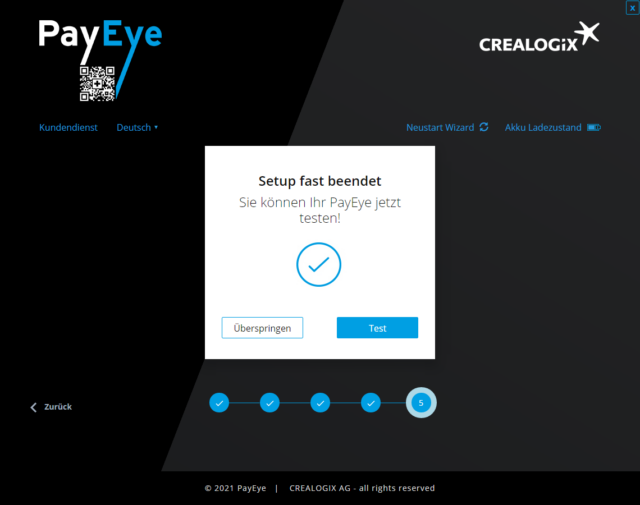
Das PayEye ist nun erfolgreich eingerichtet und betriebsbereit
Mit «Test» können Sie einen Test-Scan starten
Mit «Überspringen» können Sie direkt losgelegen
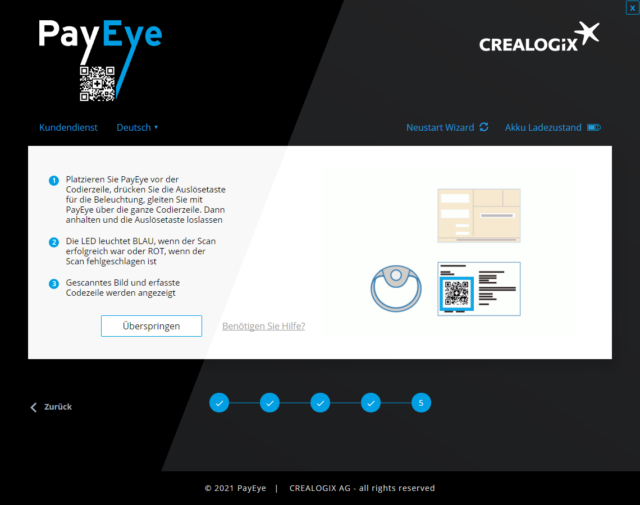
Hier ist die Ansicht des «Test»-Centers:
Wählen Sie entweder «Überspringen» (falls Sie keinen Test durchführen möchten) oder starten direkt einen Test-Scan
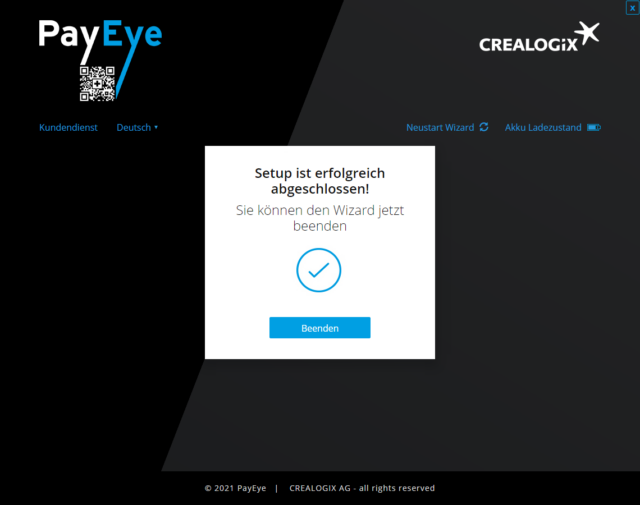
Klicken Sie auf «Beenden»
Assistent öffnet sich nicht
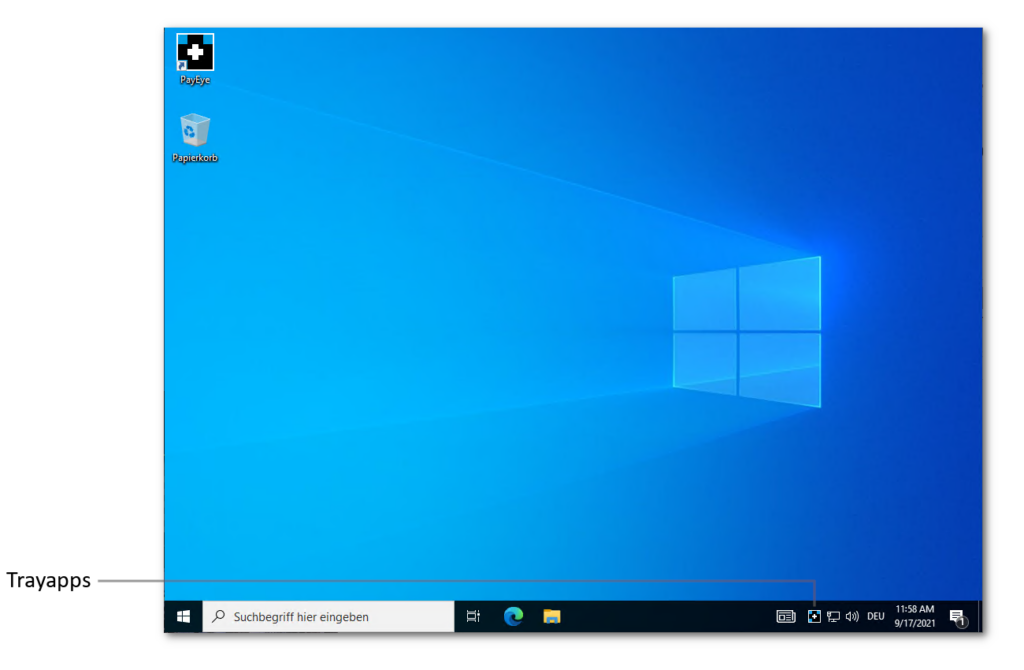
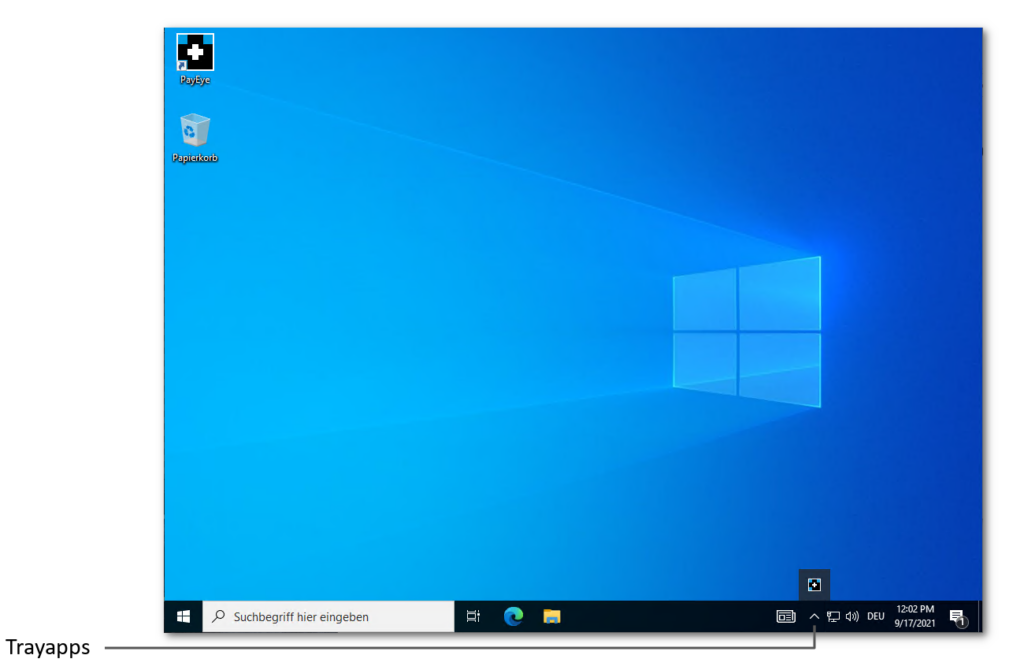
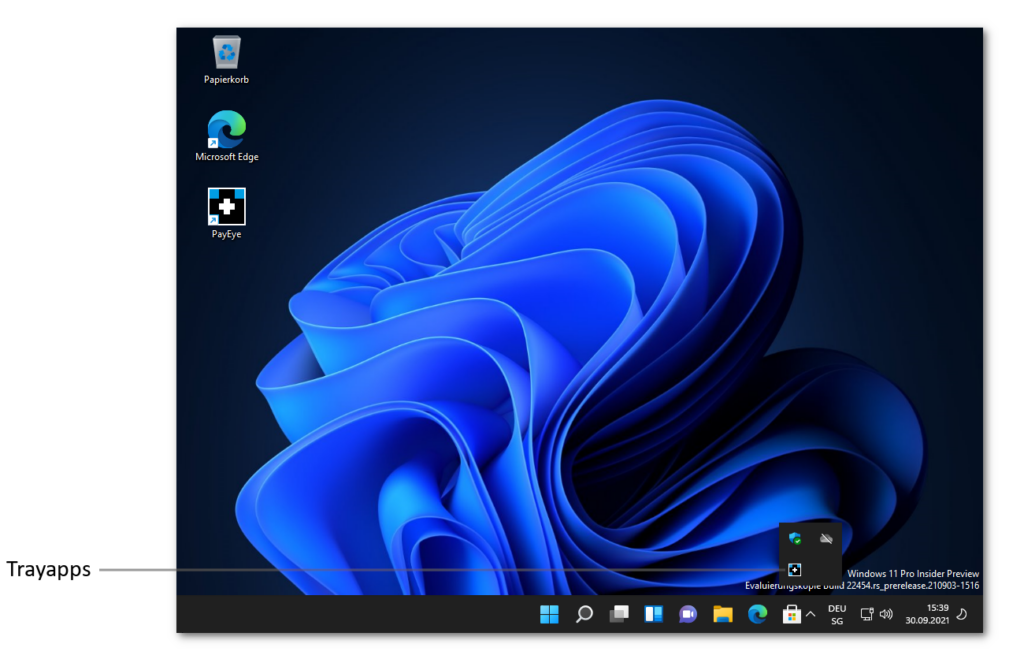
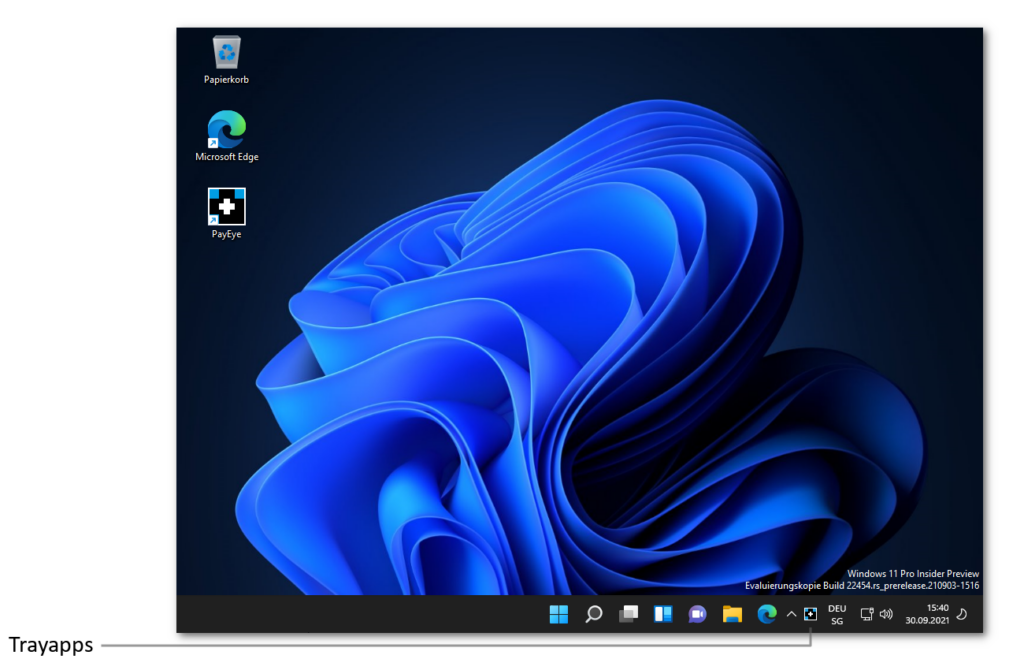
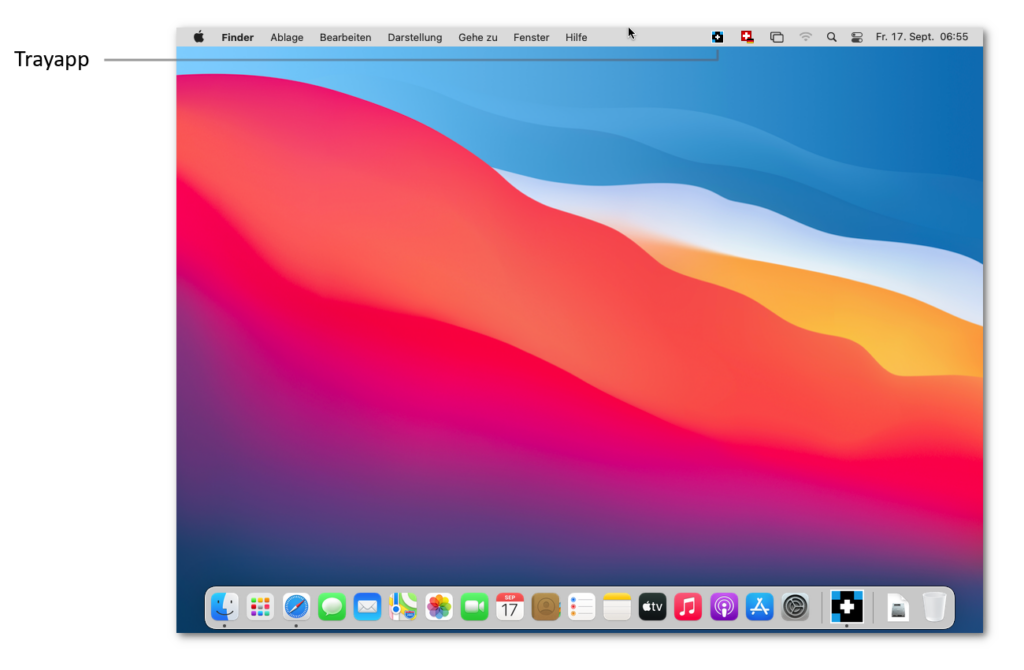
Sollte sich der Assistent nicht öffnen, finden Sie die Software jeweils in den Tray-Apps.
Je nach Windows Einstellungen, kann sich die Software auch unter dem “Dächlein” verbergen.
Windows 10 Trayapps
Windows 11 Trayapps
macOS Trayapps
PayEye Menü
Wenn Sie auf das TrayApp Symbol klicken (oder auf Windows auch auf das Desktop Symbol) erscheint das PayEye Menü. In diesem haben Sie Zugriff auf alle wichtigen Funktionen.
So sehen Sie im ersten Eintrag die aktuelle Finanzsoftware, welche gerade aktiv ist. Sie können diese über den kleinen Pfeil öffnen und so im Dropdown auf die gewünschte Finanzsoftware wechseln.
In diesem Dropdown Menü erscheinen alle von Ihnen definierten Finanzsoftware, welche Sie in den Einstellungen beim Punkt “Finanzsoftware” voreingestellt haben.
Über den Button Einstellungen, öffnet sich das Fenster Einstellungen.
Die Funktion Datei scannen bietet die Möglichkeit, QR-Rechnungen zu erfassen, die als PDF oder JPG vorliegen. Z.B., wenn Sie diese per Mail erhalten haben. Dadurch muss die Rechnung nicht ausgedruckt werden.
Über die Option “Vorschau” kann ein “Live-Scan” auf dem Bildschirm angezeigt werden. So können Sie sehen, was das PayEye scannt. Dies ist eine optische Hilfe bei der Einlesung.
Ist die Vorschau “blau” hinterlegt, ist sie aktiviert. Mit einem Mausklick kann die “Vorschau” ein-oder ausgeschaltet werden.
Über den Punkt “Test Center” können Sie direkt das Testcenter öffnen.
Bei den beiden Funktionen “Support” und “Info” werden Sie auf das Info-Fenster des PayEye weitergeleitet.
Über den Button “Beenden” können Sie die Software beenden.

Einstellungen
Unter «Einstellungen» gelangen Sie zur Applikation, in welcher Sie unter den drei ersten Reitern «Sprache», «Finanzsoftware» und «Verbindung» individuelle Einstellungen vornehmen können.
Sprache
Unter «Sprache» können Sie zwischen drei möglichen Menüsprachen wählen

Finanzsoftware
Unter «Finanzsoftware» können Sie Ihre bevorzugten Finanzsoftware und E-Banking Applikationen auswählen und ändern
Bis zu 6 unterschiedliche Voreinstellungen stehen zur Verfügung
Die voreingestellten Produkte lassen sich in der Trayapp dann bequem wechseln
Verbindung
Unter «Verbindung» kann die bevorzugte Verbindungsart eingestellt werden.
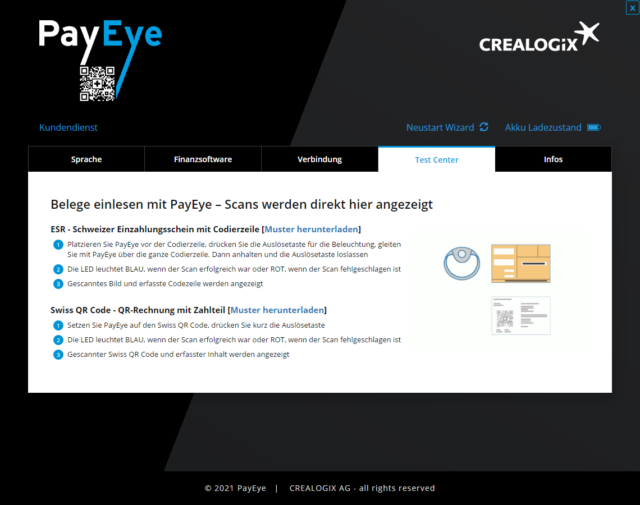
Testcenter
Im «Testcenter» kann geprüft werden, ob PayEye die Codierzeile oder den Swiss QR-Code einliest
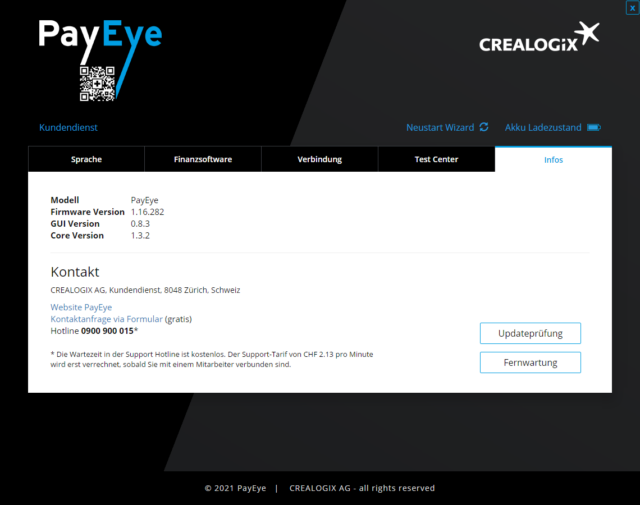
Infos
Im Menüpunkt «Info» finden Sie verschiedene Informationen:
- Support-Homepage mit Anleitungen
- Kontaktformular
- Hotline-Nummer
- Software-Update
- Fernwartung (Direkter Internet-Link zum automatischen Download von «TeamViewer»)
Datei Scannen
Über diese Funktion können Sie QR Codes in Bildern und PDF’s in Ihre Software importieren, ohne das Sie die Rechnung jeweils ausdrucken müssen.
Dabei werden die Formate JPG, PNG und PDF unterstützt.
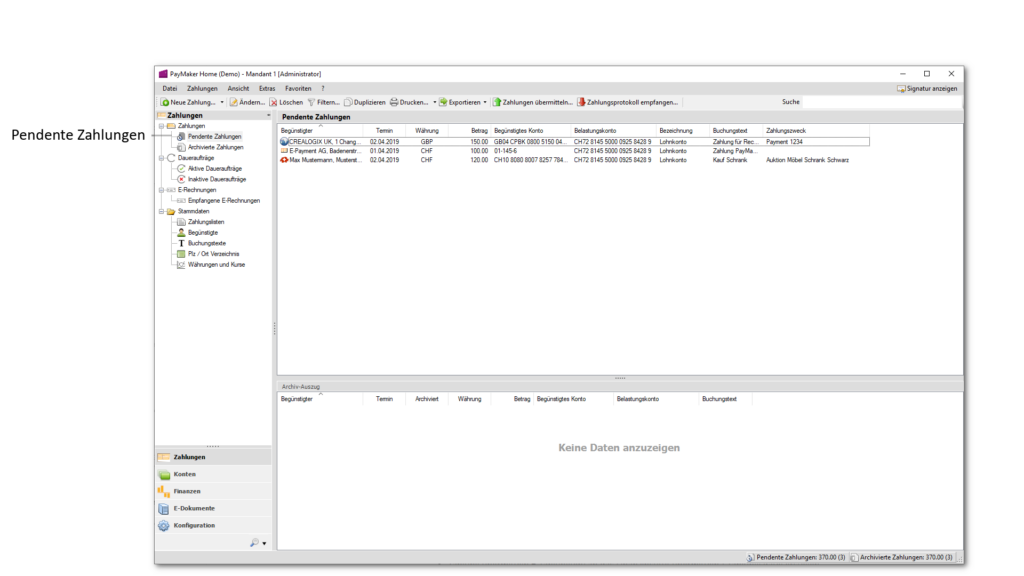
Einlesen in eine Finanzsoftware
Klicken Sie zuerst in Ihre Finanzsoftware wo die entsprechenden Informationen hineingeschrieben werden sollen. Achten Sie ebenfalls darauf, dass nur dieses Fenster als “Aktiv” gilt. In unserem Beispiel nutzen wir den PayMaker.
In diesem Fall müssen wir nur den PayMaker bei den “Pendenten Zahlungen” als aktives Fenster haben.
Klicken Sie anschliessend auf das Trayapp der PayEye- Giromat Software und wählen Sie die Option “Datei Scannen”.

Anschliessend öffnet sich der Explorer. Suchen Sie nun nach der Datei, welche Sie einlesen möchten. Klicken Sie anschliessend auf Öffnen.
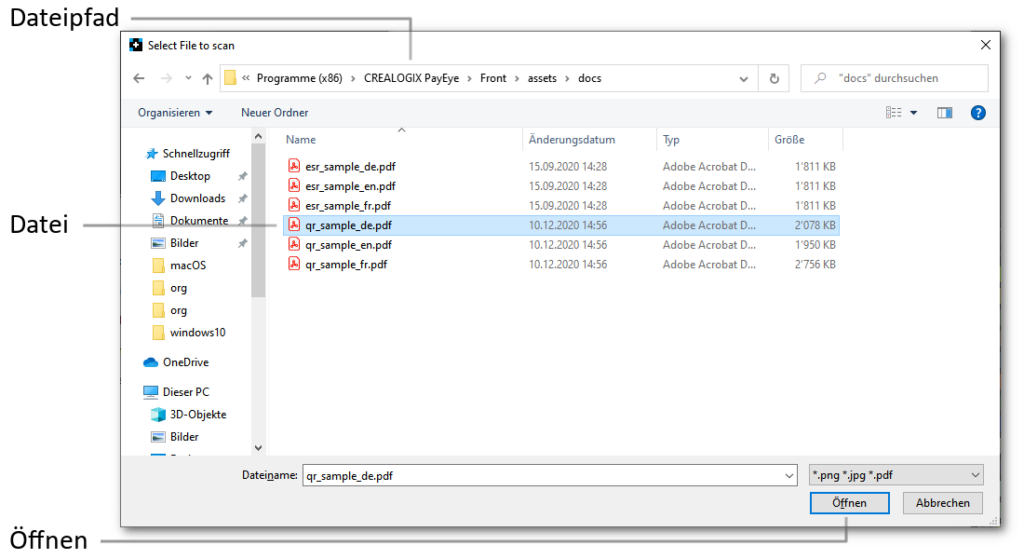
Die Daten werden nun ausgelesen und an die entsprechende Software weitergegeben.